Day 3 of Anthro Necklace Week!

Are you enjoying the tutorials? If you’ve missed any, here are the links so far:
Today we have the lovely Narcissus Net Necklace. Say that three times fast.
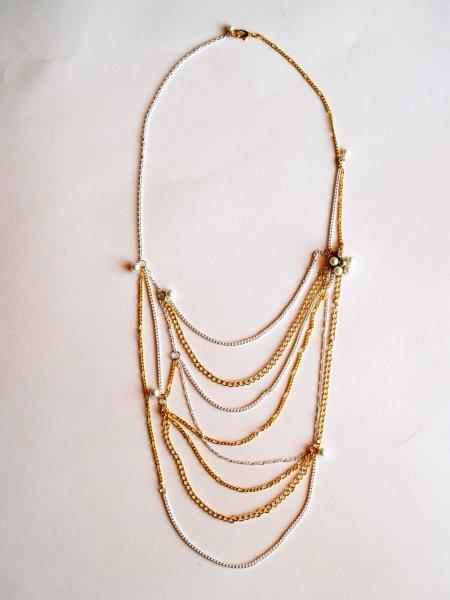
Here’s mine:
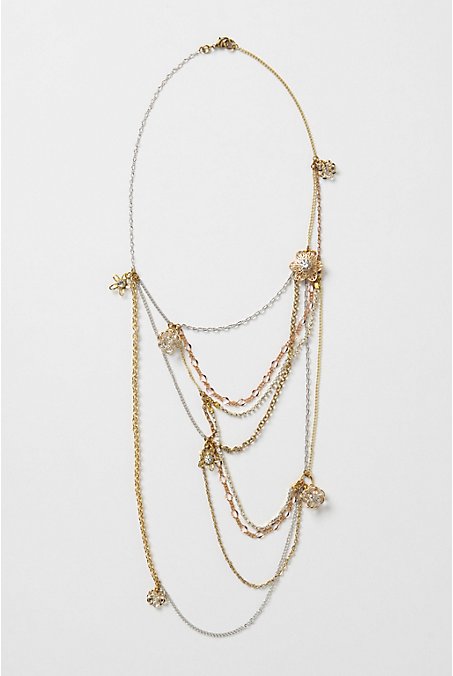
The Anthro Version:
( I think there must be little Anthro Elves with little tiny fingers that worked for days to get theirs to lay like this – with no funkiness in the chains.
Seriously. How did they do that?
I obviously do not have tiny elvish fingers.)
Seriously. How did they do that?
I obviously do not have tiny elvish fingers.)
To make your very own Narcissus Net Necklace you’ll need:
Materials:
- Wire cutters
- Needle Nose Pliers
- Round Nose Pliers
- Ruler or Measuring Tape
Supplies:
- Assortment of chains – gold & silver
(Keep the chains small.
We’re going for delicate spider-web-inspired here – not Mr. T I’m-gonna-bust-you-up inspired.) - Small pearls or charms (6)
- Larger pearl flower or charm
- Head pins (6)
- Jump rings (several sizes) (around 12)
- Lobster Clasp
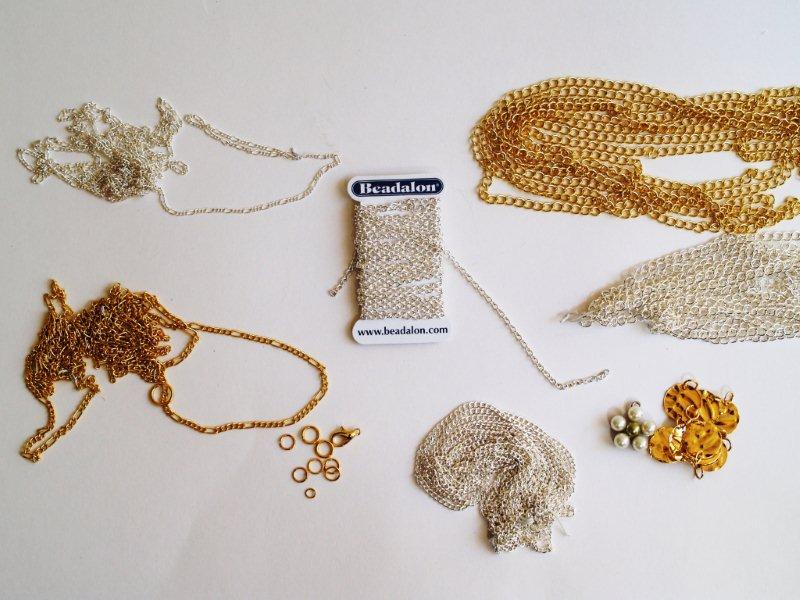
(There are some gold charms in the picture that I thought I’d use but looked ridiculous. So ignore them.)
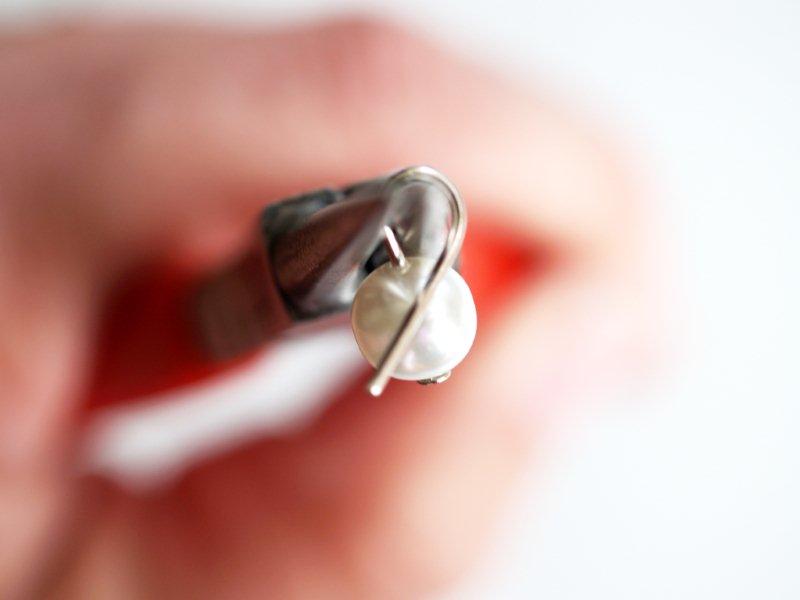
Start with making your pearl beads.
Place your pearl on a head pin.

Bend the pin at a slight angle a the top of the pearl.
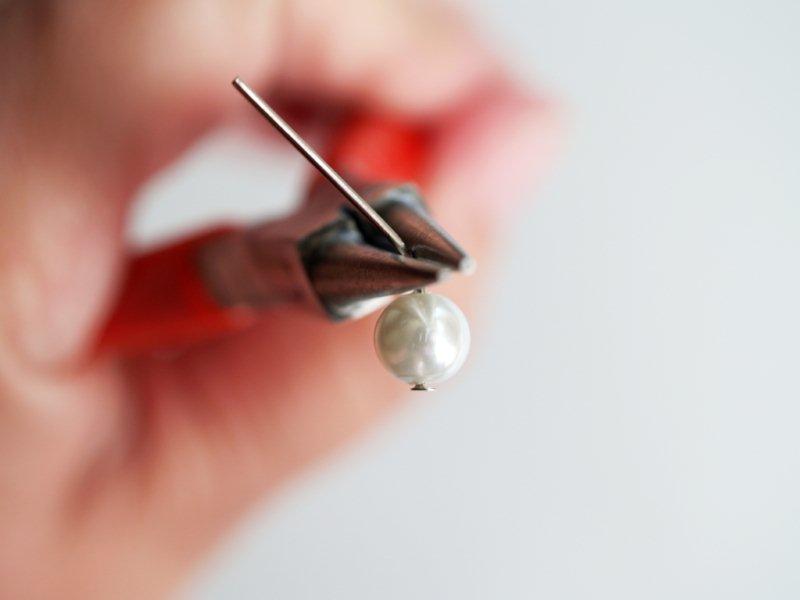
Wrap the pin wire around one side of your round nose pliers, making a loop.
Clip the wire off at the top of the pearl using your wire cutters. Remember to point the flat side of the cutters away from you.
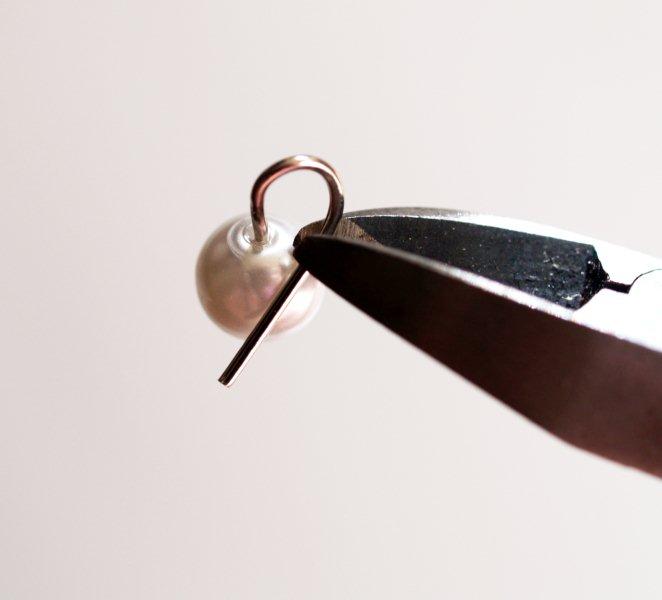
Bend your pin wire just a bit more so that it makes a complete loop.
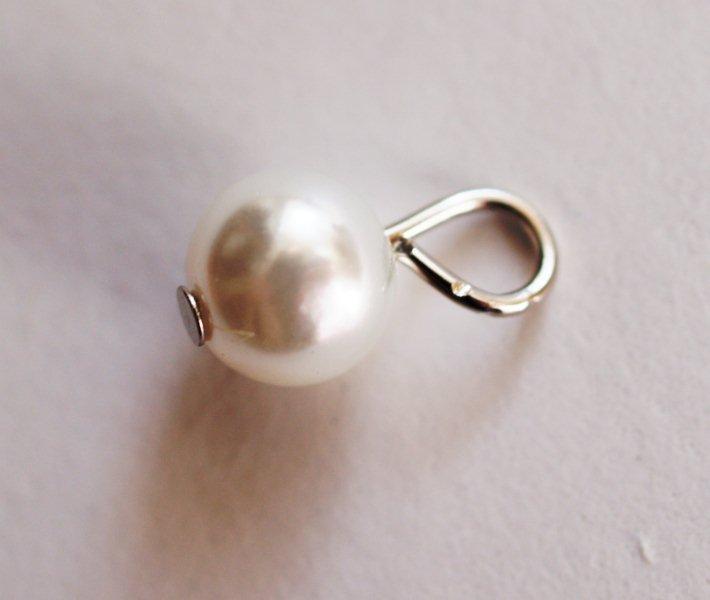
Repeat this with your other pearls. If you are using charms that have holes or rings, you can skip this step.
At this point we are going to be putting together the chains. I will explain the lengths and chains I used, but feel free to switch it up for the materials you have. I’ve tried to make these steps as clear as possible, but if something seems wonky, just send me an email. I’m happy to help.
Start with a large area that you can build the necklace on. It will help if you can lay it out in “necklace shape” and add your chains and loops that way.
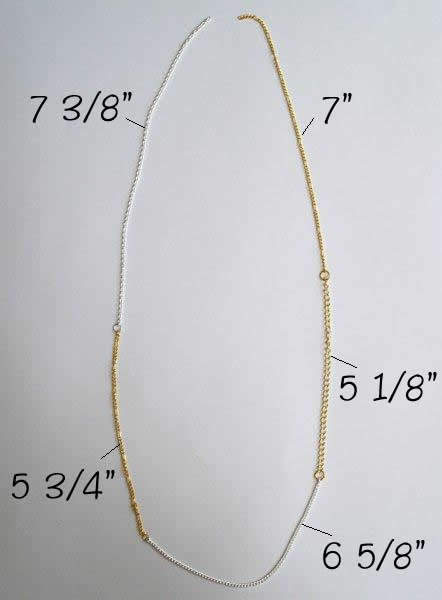
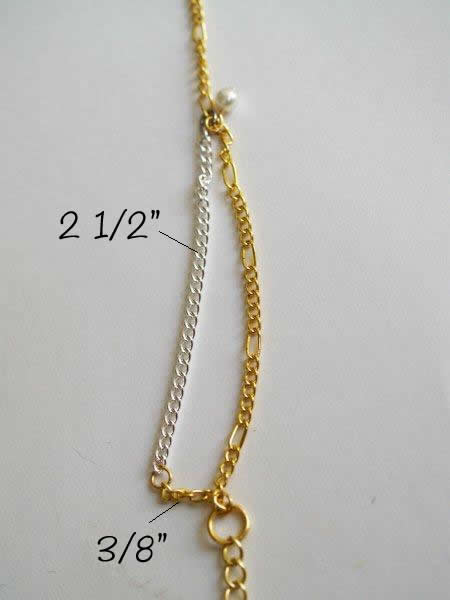
STEP 1
Start with outer loop of chain. This is made up of 5 different chains – 2 silver and 3 gold. In the picture below I have marked the lengths of each chain for you.
Cut the chain with wire cutters and attach them together with jump rings. Open the ring and place the two chain links on it, then close with your pliers.
STEP 2
On the right side, add in the small connector chain shown in the picture below. You will be adding it to the ring between the 7″ chain and the 5 1/8″ chain. Put a jump ring at the top of the silver chain and add it to the gold chain so that it makes a “triangle” shape with the 3/8″ piece as the bottom. Add one of your pearl loops to the top jump ring as well.
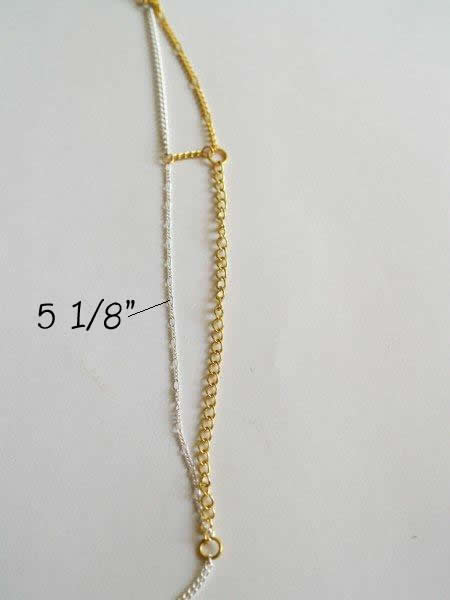
STEP 3
To the left ring on the 3/8″ chain, add the 5 1/8″ silver chain pictured below. Connect it to the ring at the bottom of the 5 1/8″ gold chain.
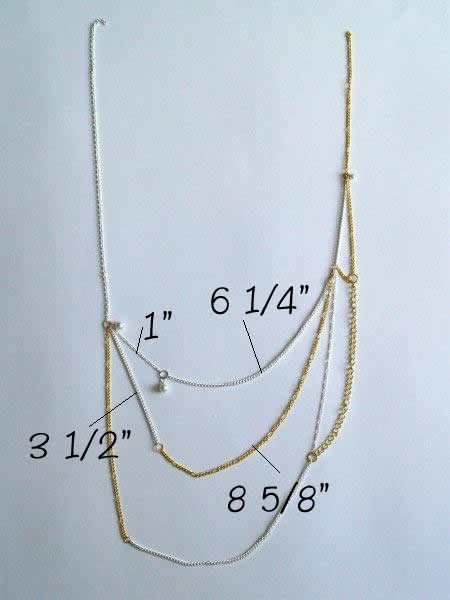
STEP 4
Now we’re going to start adding in some of the cross chains. Connect two different silver chains – a 1″ piece and a 6 1/4″ piece with a jump ring. Add a pearl loop to this jump ring.
Connect another two chains - a silver 3 1/2″ chain and a gold 8 5/8″ chain together with a jump ring.
Connect another two chains - a silver 3 1/2″ chain and a gold 8 5/8″ chain together with a jump ring.
Add the left sides of the two chains you just made to the jump ring at the middle on the left side. Add the other side of the chains to the ring between the 2 1/2″ piece and the 5 1/8″ piece on the right side.
STEP 5
Still with me?? Hang in there. We’ve almost got it. And it will be so worth it. I promise!
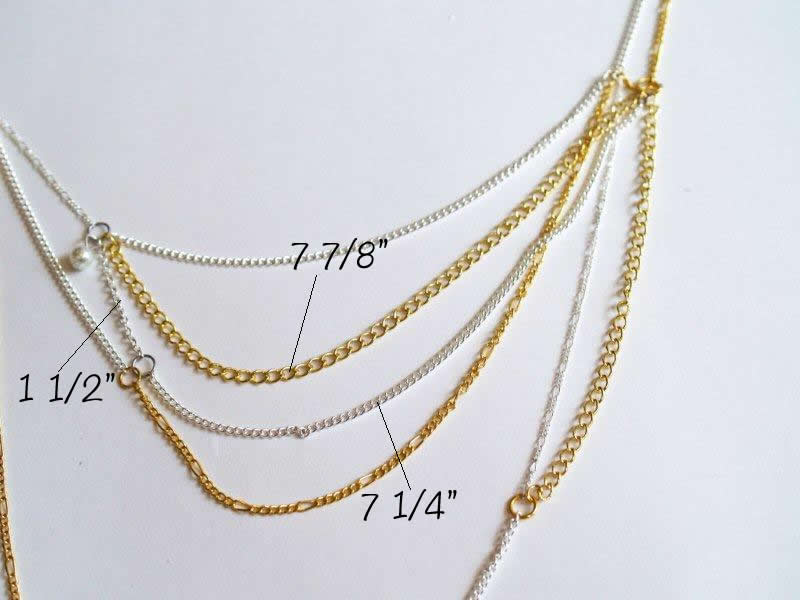
Cut a 7 7/8″ gold chain.
Make another connected chain using a silver 1 1/4″ piece and a silver 7 1/4″ piece, with a jump ring between.
Make another connected chain using a silver 1 1/4″ piece and a silver 7 1/4″ piece, with a jump ring between.
Attach both of these chains to the ring between the 1″ and 6 1/4″ silver chains on the left. On the right attach them to the ring between your two outer gold chains.
STEP 6
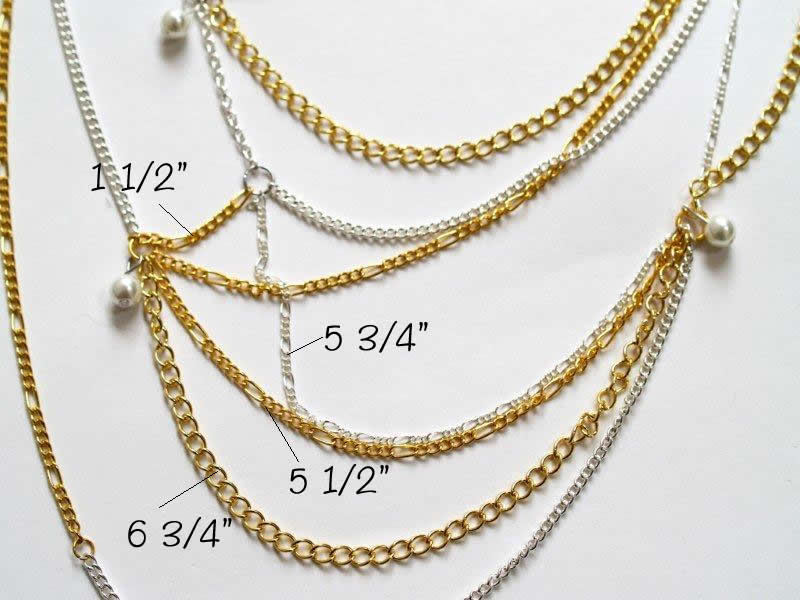
Last grouping. It looks complicated but just follow the measurements.
Cut the following pieces.
1 1/2″ Gold Chain, 5 3/4″ Silver Chain, 5 1/2″ Gold Chain, & a 6 3/4″ Gold Chain.
You have a jump ring in the silver connecting chain from Step 5. Add one end of the 1 1/2″ Gold Chain and one end of the 5 3/4″ Chain to that ring. Close it up.
To the jump ring between the silver and gold chain from Step 5, Add the other end of the 1 1/2″ Gold Chain, as well as one end of each of the other two chains you just cut. Add in a pearl loop and close that ring.
So now you should have the silver and two gold chains loose. Add the other end of all three of these to the ring on the left outer loop that connects the bottom silver piece to the gold and silver strands from Step 3. Add a pearl ring to this as well then close it.
Ok Whew.
Time to finish up the top of your necklace. On the left side, to the silver chain add a large jump ring and a pearl ring. Close this ring.
On the right side, to the gold chain add a lobster clasp.
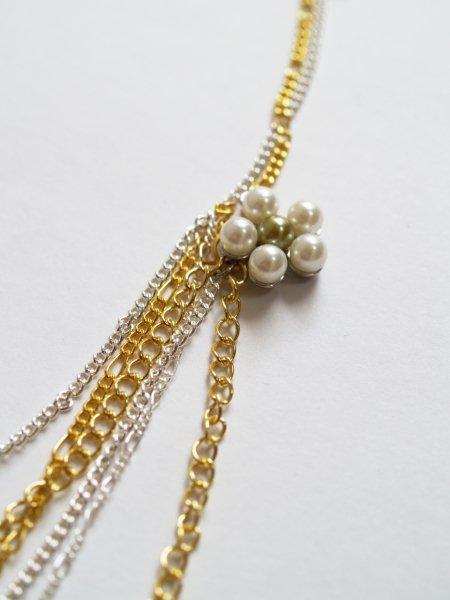
Add a large pearl flower or large charm to the middle jump ring on the right side of the necklace between the gold chains.
All done! I hope this isn’t too scary. You’ll be repeating the same steps several times with jump rings and chain, and if it’s not exactly the same when you’re done, it will still look just as great!
Here are more finished shots for you:
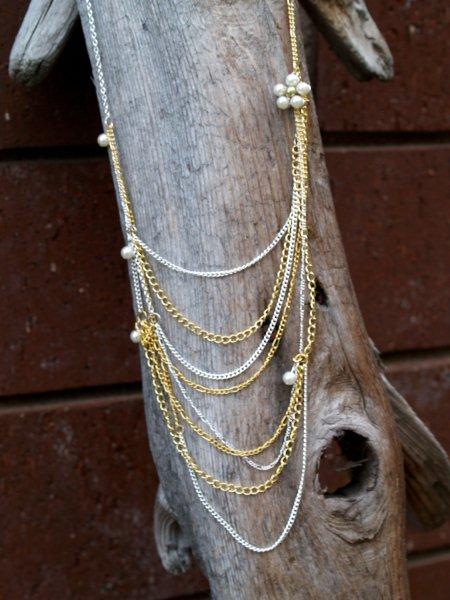
And a shot of me wearing it – cause it might be hard to picture how it looks on.

I’m really happy with how it came out! What about you? Would you give this one a try?
Please say yes. ;)
Don’t forget – we have two more days of necklaces and tutorials – then the big day.
Friday.
When all the Giveaway posts will go up!
Don’t miss out!
Friday.
When all the Giveaway posts will go up!
Don’t miss out!
0 komentar:
Posting Komentar