Rabu, 29 September 2010

inspired2


painted wallpaper {a tutorial}

August 5, 2010 | 97 Comments
When I first took over the front office, I knew I wanted to make it a lighter, more inspiring room to be in.  I thought about painting stripes because I really do love them, but I already have some thick ones painted in the boys’ room. Then I thought wallpaper would be nice. But here’s the thing about wallpaper: 1. I always like the most expensive one and 2. putting it up is a pain {although now that I think about it, it would probably be easier to hang wallpaper than to paintit. Oh well.}
So I decided that instead of looking for bargain wallpaper, I could just make my own.   I really like these curtains from Ballard Designs and decided to take the pattern as my inspiration.
image
Here are the steps:
1. Create a template {or download mine at the end of the post}
2. Trace the design onto the wall. Over and over again. Now it makes a lot of sense to use a level to make sure you are not drawing diagonally down the wall, but I didn’t go to such effort. I think I have a pretty good sense of straight {if that makes sense} so I was able to eyeball it.
IMG_3877
No, Brady did not help me trace the pattern, he was just my model.
IMG_3876
Check out those sweet grubby little four-year-old fingernails.
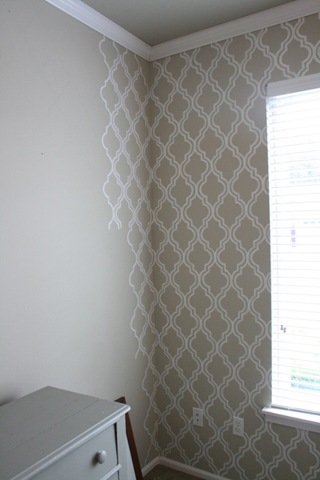
There were sections where the pattern got a little wonky, so I just improvised and figured once the entire pattern was up, you wouldn’t notice little imperfections.  The one thing I did try to do was to keep the pattern equal along the top & bottom of the wall {see photo}
wall
3. Paint over the lines {I painted along the inside of the line}.  I used a small paint brush that was the width that I wanted the lines to be and white latex paint we had leftover from the kitchen.
IMG_4384
IMG_4383
IMG_4379
It takes a long time. But if you try it, just keep going … it is so worth it!
IMG_2276 
IMG_2277
IMG_2335
Here it is again in it’s ‘after’ state.
officeentrynew       
And there you have it.
A project that was simple to do but just took lots of time and a steady hand.
To download the template that I used, click here.
If you try this out, please send me a photo … I’d love to see what you come up with!

DIY TUTORIAL and a giveaway!


Happy Monday everyone! Today I am going to show you how to make this necklace and introduce my first giveaway! Below are the steps to make this tulle necklace. And to win this necklace, just leave me a comment below! A winner will be announced on Friday.
Good luck! Hope you enjoy this little tutorial!
Step 1: Pick out your fabric and beads. I am using black tulle and marbles for the beads. Tulle as I found out is pretty hard to work with! I’ve also done this with lace which was a little easier to handle but you could use any fabric.
Step 2: Measure the fabric around a bead and then add an inch, this is where you will cut.
Step 3: Cut the fabric the long way.
Step 4: You should now have a long strip of fabric. Fold it in half.
Step 5: Sew the folded fabric at the open end.
Step 6: You should now have a tube.
Step 7: In order to turn the tube right side out, attach a safety pin to one end.
Step 8: Feed the safety pin through the tube.
Step 9: Once the tube is right side out, put a bead in the tube and center it.
Step 10: Make a knot at each end of the bead.
Step 11: Feed another bead into the tube and knot after the bead. Alternate sides each time you put a bead in. Repeat putting the bead in and knotting it until you reach a desired look.
Step 12: Sew the ends shut.
Step 13: Add flower by gathering strips of the fabric together and sewing the center together.
Step 14: Add a center to the flower with other beads by threading them through the center of the flower. Attach the flower to the necklace.
Finished Necklace! You can see other necklaces I made similar to this one here.
Now leave a comment for the chance to win this!!

Organza Embellishments


The gifts for my birdies needed some sprucin’ up.  I’ll have to share what the actual gifts are in a later post when the girls are in Hawaii.  They don’t have the self control to resist peeking on here… nor would I! :D
After hopping from one blog to the next, I came across Reese Dixon’s tutorial on DIY organza flowers.  Perfecto!  This floral embellishment was just what I was looking for to ‘pretty-up’ the gifts.  I took a stab at it yesterday, and this project is a cinch!
All you need is:
  • organza fabric (petals)
  • beads (stamen)
  • candle (wilt the petals)
  • needle and thread
tutorial
  1. Cut 4 or 5 square pieces of organza fabric
  2. Cut out petal-shaped patterns.  I layered the fabric and cut the pattern once.  This made the petal shapes inconsistent, but sloppiness really does work in your favor!
  3. Hold the petal inches above the candle flame to wilt the petal.
  4. Do this for each petal.
  5. Layer your petals to create the flower.  Set aside the bottom layer.  Sew from the bottom of the flower, so the thread with your knot is on the bottom.  Add the layer you set aside, and continue sewing.  This hides the knot.
  6. You’ll finish it off where you started, so the knot is hidden above the bottom-most layer.
And the finished product…  TA-DA!
img_6746
Floral embellishments are my new best friend.  I’m thinking of other ways to use these things for our reception decor… perhaps escort cards or favors?  How are you using floral embellishments for your wedding?

Craft Project: Plastic Bottle Beads


I found a great tutorial for plastic bottle beads on ThreadBanger viaWaiting for Wonderland. The beads were very easy and quick to make. I made them a little different than the directions by addingwashi paper to them. Below I share how I altered the tutorial and a few tips for making the beads.

Plastic Bead Tutorial, Click here.

Instead of coloring the plastic with markers, I glued washi paper to the plastic. You'll want to cover only part of the plastic with paper. This way when you roll up the plastic to make the bead the paper will not be exposed.

* When making the beads always use caution. Some plastics can be toxic when melted.

* If you don't have a heat gun, a blow dryer will work too; I tried it both ways. However, the heat gun yields better results.

* Be careful of over heating the bead which can lead to the edges curling up. Hold the seam down with tweezers while heating. This will prevent it from curling up.

Close up of the back of the bead. The beads do not look perfect but I suppose that's part of their charm.

Berry Nice Necklace


  • Completed Project: Berry Nice Necklace Picture #1
  1. Step 1

    Step 1
    Measure and cut 41cm off your chain. With your pliers open the last loop of the chain and attach the bolt ring, close the loop, repeat on the other end to add the tag.
  2. Step 2

    Step 2
    You should now make 45 beaded headpins. To add your different shades of pink beads to the headpins, slide one small plain cup, then the beads of your choice followed by another plain cup after the beads onto the headpin. With the cutting part of your pliers, trim the headpin approximately one centimetre above the plain cup, With the round nose part of your pliers bend into a loop. To create the chunky style, add a few beads of different sizes and shades to some headpins. Always put the plain cups on either end of the headpin to create a more professional look. With your 15mm crimson wood beads, only use one bead per headpin, with the cups either side.
  3. Step 3

    Step 3
    To add your black beads, take two headpins, thread a plain cup, one 4mm bead, a 6mm, an 8mm, a 6mm followed by a 4mm bead on each headpin to make a tapered shape, finishing with a plain cup. Trim the headpin, bend it into a loop and repeat for the other headpin. Make one headpin with a 10mm black bead with cups on either side. For your final black headpin, thread a plain cup, a 4mm bead, a 10mm and a 4mm followed by a plain cup. Trim the headpin and bend it into a loop.
  4. Step 4

    Step 4
    With your pliers attach the beaded headpins to the chain. Add the larger beads to the centre of the chain, working out from the middle. Keep adding the beaded headpins so that the smallest items are on the ends to create a crescent shape with your beads. Make sure the crimson beads are spaced evenly along the length of the beaded section. Attach the black beads, with the two longest headpins towards the ends of the beaded section, so that they are quite prominent, and the smaller ones spaced evenly between them.
  5. Step 5

    Step 5
    The beaded section should take up approximately 15cm in the centre of the chain. This is what your finished necklace should look like.